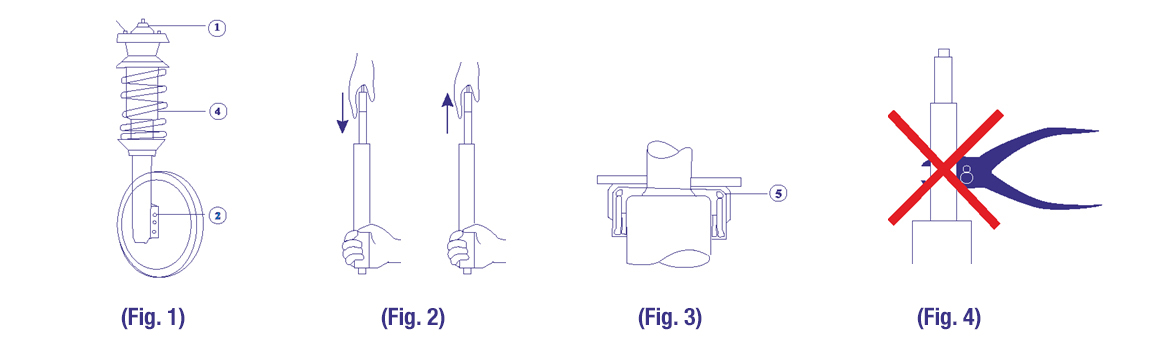
Dismantling (fig1)
-
Loosen but do not unscrew the top center nut (l).
-
Unscrew the lower fixing (2).
-
Unscrew the upper mounting (3) and remove the shock absorber assembly.
-
Compress the suspension spring to remove any pressure on the center nut (l). Take the greatest number of turns between the hooks of the spring compressor.
-
Remove the central nut (1) and all the other parts from the upper part of the shock absorber, noting their positions (including the compressed spring).
-
Check the condition of the dismantled parts and change the defective parts, in particular the anti-bottoming stop.
In the case of a cartridge shock absorber: unscrew the worn nut (4) and remove the cartridge.
Priming (fig2)
Don't forget to prime by pulling the shock and compressing it vertically a few times.
Assembly
1- For cartridge shock absorbers:
-
1-1 Thoroughly clean the inside of the tube and pour approximately 50 ml of engine oil into it.
Note :The oil will be running between the insert and the tube to allow a good cooling of the shock absorber This dose of oil will be trapped between the cartridge and the tube to allow proper cooling of the shock absorber.
-
1-2 Insert the cartridge of replacement in the strut and assemble the centering part if it is delivered with the shock absorber (Fi g. 4). Tighten the nut of the insert as recommended by the manufacturer of the vehicle
Tighten the cartridge nut to the torque recommended by the vehicle manufacturer.
2-Pull- up completely the stem and move upwards the spring of suspension with upper attachmet, the dust-cover, the thrust anti-bumping and the new upper central nut.
3-Use a torque wrench to tighten the upper and lower shock absorber mountings to the vehicle.
4-Failure to comply with torque specifications or incmrnst tightening will significantly reduce shock absorber life and cause malfunctions.
Caution:The upper attachement, the seat of the upper spring and the spring of suspension must be fitted in the same order as in the beginning.
Never use a blunt instrument, such as grips or serewdrivers, to hold the stem for
tightening the upper central nut. (Fig.4).
Do not rnake modifications on the shock absorbers such as new wholes on the spring seat.
Shock Absorbers must imperatively be replaced by pair (front or rear)
in order to guarantee the vehicle's balance, its road holding and efficient braking.
Inspection after assembly
After replacing the front MacPherson struts, check the adjustment of the front axle.
 English
  Français